Saturday 29 August 2009

My new dress

Those who know me will know that I absolutely adore the colour grey, any shade, any hue, grey is just always perfect, and my wardrobe is totally stuffed with it! So when I found this gorgeous grey and pink flowery fabric in Truro Fabrics for £4.99/m I couldn't resist.

The end result:

You can't really see how pretty the flowery fabric is from there, so a close-up:

I love it! The bandeau top bit is made from a rectangle of grey jersey (you can either cut up a cheapy top or buy expensive jersey - I know which I'd choose!). Then I attached a black elastic casing bit (see previous posts about threading elastic through etc etc!) using a zigzag stitch with shirring elastic as my bobbin thread. Then the skirt was an elongated version of the "not-enough-material" skirt, and...drumroll please...I even lined it!! Harriet and I decided we needed to start finishing things off properly, and also embellishing things, which is why I added the ruffle on the top bit. I just used pinking shears to cut out the two ruffles, then gathered them (using two rows of long machine stitches and pulling the ends) and sewed them to a straight middle section. I think the buttons just complete it :)

Perhaps I'll just show you some new shoes too while I'm talking about my love for grey! They were from a tiny shoe shop in Sadler's Walk, Chichester called Zigzag which has lots of lovely things!


Flik

x

Thursday 27 August 2009

Matching Skirts!

Last weekend I went to visit Harriet in Cornwall, where she's been staying all summer so that she can work down there. On Friday afternoon we went into Helston, which she frequents rather often, due to her almost obsessive addiction to independent charity shops (of which there are many good ones there) to source fabric and clothes for altering/making up, and found 2 packs of about 60"x 60" gorgeous thick navy cotton with a white flower pattern for £1 each! So of course we had to have them. Then she showed me a tiny little fabric/haberdashery shop there, which had some marked-down, discontinued patterns, where we found McCall's M5473 for high-waisted tulip skirts:


Ok, so we don't really like patterns, but sometimes they're useful, especially when you're wanting to do a certain shaped something-or-other but you don't really know how. I've been wanting to do a stiff-waisted skirt with box pleats for ages and ages so a pattern for £2.90 was a complete steal! A whole day of sewing followed, 9 til 5 hard grafting, with the end result being two matching skirts! We only altered the pattern by making it about 5 inches shorter than it said to - other than that it was perfect.

We wore the end result on a brief country walk (so with thick socks and boots!) because of spending the entire day indoors attached to a sewing machine! Agreed, we are a little bit old to be wearing matching stuff, got several funny looks... but it was fun all the same! Harriet's was styled to perfection - god I love that blazer!!! My excuse was only having 3 days' worth of clothes to accessorise with instead of my whole wardrobe!

Flik

x

Friday 14 August 2009

Purple Skirt

Another easy and quick little make was this high-waisted, elasticated silky skirt.


The fabric came from a remnants bin, I think there was about 80cms of it for just over a £1..bargain :) in fact the wide black elastic was the most expensive, it's really strong, good quality stuff. I did pretty much the same thing as the "not-a-circle-skirt" skirt, but used a steeper slope for the pattern piece because I wanted the skirt quite fitted at the bottom but a bit of room for gathers at the top - tulip skirt shape...ish.

To attach the elastic you either need 4 hands or a very useful friend! One of you stretches the elastic, and the other sews the material to it using a zigzag stitch. Then it gathers like magic once you're all done and let it go.

I really like how it turned out - it's a super useful going-out skirt because of its silky finish, and because it can be used to do the colour-blocking thing - as above. It's actually a magenta sort of colour (not the purple it looks in the shoot) and goes with lots and lots of things. Including these gorgeous hidden platform open-toe heels and my "sweetie" necklace (bought in NYC a couple of years ago and goes with absolutely everything!):


Big thank-yous to Sadie from Sadie's Wardrobe who actually managed to discover this hidden-away-just-starting-out blog! No idea how crazy we went when we discovered somebody we didn't know had found our blog...and left lovely comments! So if you haven't seen hers yet, please visit - it's one of our favourites :)

Flik

x

Variation on a Theme

A variation on the circle skirt is one I like to call: The "I-haven't-got-enough-material-for-a-circle-skirt" Skirt. It comes in handy especially when you're nicking leftover fabric from your best friend!

No prizes for guessing who the fabric-nicker is!

And another example:

So fold your small leftover bit in half, and cut out this:

Pin right sides together and sew up the sides, stop before you get to the top edge, leaving a gap so that your elastic will be able to go in when you fold over to make the casing - again, see previous post about circle skirts, and follow the rest of the instructions to finish your fabric-saving skirt!

Flik

x

Circle Skirts

What to talk about next?! There are so many ideas for new things to make buzzing around in my head, but I can’t start talking about them until I’ve exhausted our “archive” of projects we’ve completed! I think I’ll rave about circle skirts next. As you may or may not have already discovered, Harriet is Queen of the Circle Skirts, and I am merely a tag-along! However, I shall attempt to convey their simplicity and wonderfulness! They are so easy because of the lack of complicated pattern pieces! Let’s imagine we’re making a simple circle skirt with an elasticated waistband. A bit like this in fact:


This is a circle skirt made from Ikea “Cecilia” fabric which is really good quality stuff and only £1.99/m! I love the colours on this version of it – goes with loads of things.

So basically, fold your material in half then in half again (checking the ninety-degree angle on the sides that share the corner where the centre of the material is) and draw two curves:


Ok, so it’s another rubbish Paint drawing (and I’ll have you know that semi-circles are seriously hard to draw…). But I hope you get the gist. Adjust how far the bottom line is away from the top line depending on how long you want the skirt to be.

Now you’ll have a big circle with a small circle cut out of the middle of it, once you’ve unfolded your material. This is our cheat's way of making a circle skirt by the way, others would tell you to do it properly (which we do do sometimes!!). Next: turn over the top of the small circle to the inside (measure the width of your elastic and add 1.5cms for seam allowance), pin and sew (leaving a gap of however wide your elastic is so that you can feed that through, with a safety pin attached to one end - and holding on to the other!). When cutting the elastic, put it round you where you want the skirt to sit, then stretch it a bit, so that it's fairly tight on you and cut it there (allowing for an overlap). Then overlap the elastic ends, once they've been through the casing, by a couple of centimetres. Stitch them together like this, because it's a strong way of holding the ends secure:
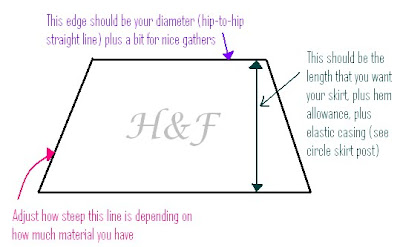
Push the stitched ends into the casing and sew up the hole you left - and "ta-dahhh" you have a circle skirt!!

Flik

x

P.S. Hemming might be an idea...I almost forgot!

Bunni's Red Dress

I think next I'll rave about a rather lovely project we completed in Cornwall - a gorgeous red prom dress that Harriet made finally, after much deliberating and indecisiveness. The problem was that the material was so gorgeous - a lightweight red taffeta - and relatively expensive (for us!) so she couldn't bring herself to cut it up without having a really awesome idea!

Anyway, the brilliant idea hit us one evening, to pair the red with cream coloured bits (tulle underskirt, straps and waistband), and we set off! To be honest I couldn't really imagine the end result but Bunni is so good at thinking about things in her head and not needing to draw them out and plan them within an inch of their lives, unlike me! She just totally made up the pattern pieces and I cut out accordingly!

I think this was the only help I gave throughout the entire thing...! But at least we have photo evidence!! Was too scared to do any of the sewing because I hadn't a clue how it was all going to look in the end!

The final result was absolutely gorgeous, and was part of our photoshoot on Kynance Cove cliffs. Although we forgot to put on the cream ribbon waistband because it was getting towards the end of the shoot and we were absolutely freezing and nearly being blown off the clifftop! My favourite part is the straps! That was a seriously inspired idea (but probably not mine admittedly!) and it really gives a little extra something to the dress.


To read her explanation of how she made it go to her own post about it on her blog (the yellow rabbit).

Comments and praise readily accepted!

Flik

x


Tuesday 21 July 2009

Shorts

More recently than the skirts I talked about before, we made (almost) matching shorts. This seemingly small project turned into quite a major effort, but it was definitely worth it! They are so cool:


So here's the story...: I had been lusting after Jack Wills' PJ shorts for ages and ages, but rather than spend way too much money (on something that doesn't seem to require much material!) I resolved to make my own.
Next came the Ikea trip (which, if you haven't already discovered, has awesome fabrics), where I discovered lovely navy blue heavy cotton curtain material with big white outlined checks.
Then my dear friend showed up at my door (and proceeded to stay for days on end, which was a nice surprise!) and announced that she wanted a pair of shorts too. So we went for it, armed with large amounts of old newspaper pages and lots of sticky tape (and a tiny bit of help from a 70s pattern for mens' pyjama trousers that we found stashed away).

We made up a pair in old white curtain lining first - really wish I had a picture of us actually wearing them...rather amusing - but this will have to suffice:


They look gigantic - but really, once there's a bit of ribbon threaded in the top and tied in a pretty bow at the front they're lovely! I think we made the legs a bit less wide than these as well, but quite long - so that they could be rolled up into turn-ups.
Ok, I'm pretty rubbish at explaining things in words - so I drew a rather primitive-looking diagram to try and show you how to make them!
Where it says the back has to be higher...I think that was just me...because of my exceptionally rubbishly-endowed behind...! It's actually probably the other way round for the majority but changing the diagram would take so long. So ignore if you're lucky enough to have more! Just play around with the template.
Put right sides together and do following:


Ok, next is quite complicated...and Really Hard to explain! Look at the shorts face on; the middle bit that is sewn together at the top (from where you went down the front seam) - make that flat (like all in a long line) and do the same to the back, and pin them together and sew down there. By doing that all the 4 bits will come together to make the crotch of the shorts. I hope that was vaguely understandable! If not, just leave a comment telling me to sharpen up my act...

So then its quite simple, fold over the top, leaving a gap where you'll feed in the ribbon (sew up by hand later). Make holes where the ribbon will come out at the front too, a bit like you would do buttonholes (i.e. stitch round them so they're not just fraying ends of material!). Then do turn-ups if you want - I'm sure those are possible to figure out! Secure them by sewing up each side of them (in centre and at sides).

And "ta-daah" you will own a lovely pair of pyjama shorts!!!

Flik

x